Deep Learning
Getting Started with NLP Using the TensorFlow and Keras Frameworks
April 3, 2019
10 min read


TensorFlow is arguably the most publicized Deep Learning framework ever. As a result it is also the most popular, most used and the most talked about Deep Learning framework in the market. What this means for us is that it has a large, vibrant community of users, filled with lots of help and tutorials.
TensorFlow was developed in 2011 at Google as their propitiatory library for Machine learning/Deep learning applications at Google. This library was open sourced in 2015 under the Apache License.

In this article, we will be looking at the classes and functions that TensorFlow provides for helping with Natural Language Processing.
This module contains classes for constructing RNN cells.
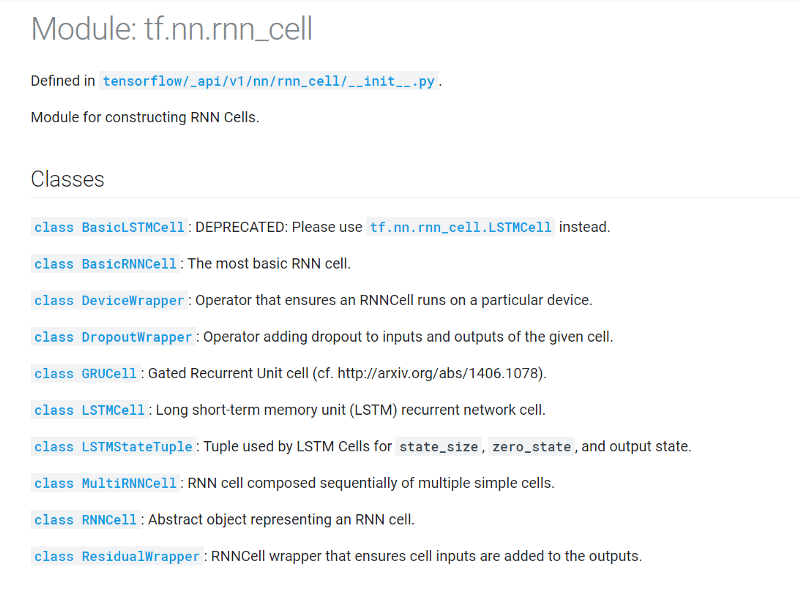
Some of the most important classes in the tf.nn.rnn_cell module are as follows:
The cell level classes, namely BasicRNNCell , GRUCell and LSTMCell accept 2 important arguments:
Here’s how one could use all of these types of classes:
# create a single GRU cell
cell = tf.rnn.rnn_cell.GRUCell(hidden_size)
# add dropout to the cell
cell = tf.rnn.rnn_cell.DropoutWrapper(cell, output_keep_prob=0.5)
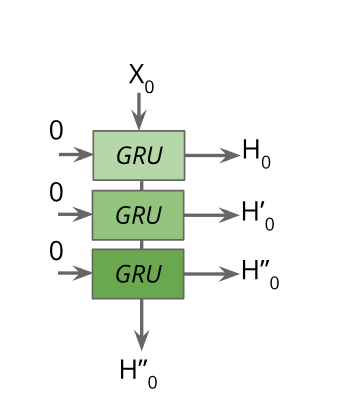
# create a stacked RNN with 3 layers
cell = tf.rnn.rnn_cell.MultiRNNCell([cell for i in range(3)])
What this does is create a structure like such:
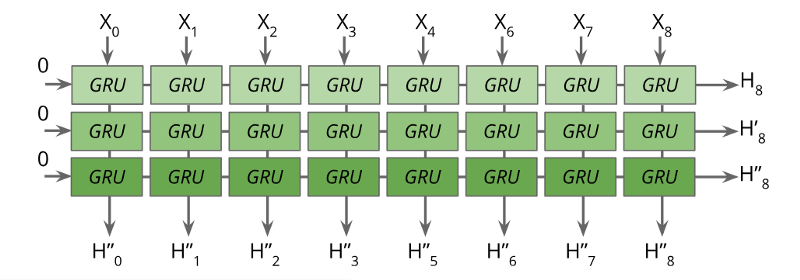
But this doesn’t look like a complete RNN, right? Yes. We need to unroll this and create a complete network now. For that we need to use tf.nn.dynamic_rnn function.
output, state = tf.nn.dynamic_rnn(cell, inputs, initial_state=rnn_tuple_state)
I would be remiss to not mention the tf.nn.static_rnn function here as it is present a lot in the beginner’s tutorials all over the Internet:
When I said that the dynamic_rnn function unrolls the RNN, it meant that the unrolling is conceptual. Actually it uses a tf.While loop to dynamically construct the graph when it is executed. In contrast, what static_rnn does is that it actually unrolls and creates a fixed sized graph that is incapable of accepting longer sequences, uses much more memory and makes the graph creation slow. So in short, just use tf.nn.dynamic_rnn.
Despite all the goodness, TensorFlow is often criticized for having an incomprehensive API which is non-intuitive and difficult to understand, especially for beginners.
For instance, it was very difficult for me to understand what the num_units argument did in the API discussed before. Does it refer to the number of time-steps? Or does it refer to the number of cell units that is there in the network? Or is it just a misnomer??
Well, you can be sure that num_units is just the size of the hidden vector representation output by the RNN. But TensorFlow doesn’t help make it easy. Learning about all those session and states doesn’t make it easy.
To deal with these problems, you need to know a high level API built on top of TensorFlow that can make it more usable — Keras.

Keras provides a simple keras.layers library for you to use in creating your own models. It contains various types of layers that you may use in creating your NN model viz. convolutional layers, pooling layers, recurrent layers, embedding layers and more.
In this tutorial we will discuss the recurrent layers provided in the Keras library. Some of these layers are:
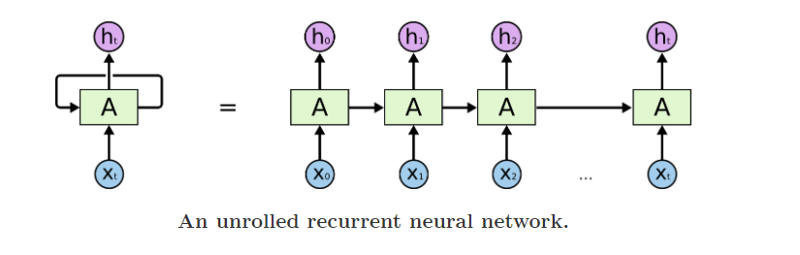
Again, we will use the following diagram to explain the parameters that these layers expect:

But before we begin discussing the layers themselves, you must know that Keras provides 2 APIs for building a NN model: Sequential and Functional.
You can create a Sequential model by adding layers, one-by-one, to the object of the Sequential class.
The first layer in such a sequential model is where you specify the shape of the input vector (through the argument input_shape or sometimes input_dim or input_length ). This is the shape of the vector x[i] (i.e, any of the vectors from x[0] to x[t] in the above diagram)
model = Sequential()

# add the first layer - an LSTM layer, specifying the input shape

model.add(LSTM(100, input_shape=(1, 100), return_sequences=True)

# add the second layer - another LSTM layer

model.add(LSTM(100)

# add a dropout layer with a probability of 0.5

model.add(Dropout(0.5))

# add another Dense fully connected layer in the end

model.add(Dense(10, activation='sigmoid'))
All the layers and the models in Keras are callable. You can call a layer by passing an input tensor to it through the parameters and it will return an output tensor as such:
output_tensor = Dense(64, activation='relu')(input_tensor)
When using this API, you must remember to create Input layer as your first layer. This is the layer where you specify the shape of the input vector x[i].
input_tensor = Input(shape=(1, 100))

x = LSTM(100, return_sequences=True)(input_tensor)

x = LSTM(100)(x)

x = Dropout(0.5)(x)

output_tensor = Dense(10, activation='sigmoid')(x)

model = Model(inputs=input_tensor, outputs=output_tensor)
Now let’s discuss the various important parameters of the recurrent layers — SimpleRNN , GRU and LSTM :
This represents the size of the last hidden state vector output from the RNN unit. This along with the input shape that we defined before are necessary and sufficient to construct the weight matrix.
Self-explanatory
In the Deep Learning community, some people find that removing/using bias does not affect the model’s performance. Hence, this boolean parameter.
This is used to specify whether the network will return the hidden state for each time-step (every h[i] from h[1] to h[t] in the diagram above) or just the last one (h[t] in the diagram above).
In some cases, when we want to create a classification or a regression model for sentiment analysis, we only need an abstract representation of the input sequence which is captured by the last hidden state h[t].
Whereas in other cases when we want to stack the layers together or when we want to generate a classification for each time-step such as in trigger word detection, we need to pass the hidden state from each step to the next layer. In those cases, we set the return_sequences parameter as true.
In each time-step, an RNN takes two inputs:
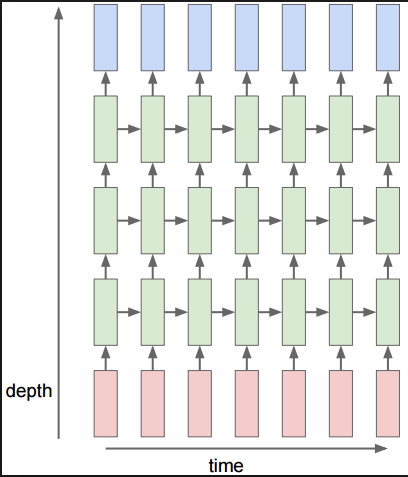
The dropout parameter specifies the dropout to be applied to the input to each recurrent unit (specified by vertical arrows).

A part of an RNN where squares represent a single RNN unit
The recurrent_dropout parameter specifies the dropout to be applied to the hidden states of the recurrent units (specified by horizontal arrows in the above diagram).
Note: Keras also provides a Dropout layer in its library. Adding this layer to your model will drop units from the previous layer. So, using this layer in your RNN model will possibly drop time-steps too! If you use the parameters in the recurrent layer, you will be applying dropouts only to the other dimensions, without dropping a single step.
Being able to directly translate your thoughts into a program is probably the most important thing that you need do as a programmer. Sure this requires expertise on the programmer’s side but sometimes the language and the framework can also do wonders to help with this. This is where Keras can be extremely helpful.
You can go from idea to implementation in very clear, intuitive steps.
Another framework that excels at this is PyTorch. Its dynamic approach (as opposed to TensorFlow’s static one) is considered a major plus point. You should check out our tutorial — Getting started with NLP using the PyTorch framework if you want to get a taste for how doing NLP feels with PyTorch.
So get in on the action and go train some networks of your own!
TensorFlow is arguably the most publicized Deep Learning framework ever. As a result it is also the most popular, most used and the most talked about Deep Learning framework in the market. What this means for us is that it has a large, vibrant community of users, filled with lots of help and tutorials.
TensorFlow was developed in 2011 at Google as their propitiatory library for Machine learning/Deep learning applications at Google. This library was open sourced in 2015 under the Apache License.
In this article, we will be looking at the classes and functions that TensorFlow provides for helping with Natural Language Processing.
This module contains classes for constructing RNN cells.
Some of the most important classes in the tf.nn.rnn_cell module are as follows:
The cell level classes, namely BasicRNNCell , GRUCell and LSTMCell accept 2 important arguments:
Here’s how one could use all of these types of classes:
# create a single GRU cell

cell = tf.rnn.rnn_cell.GRUCell(hidden_size)

# add dropout to the cell

cell = tf.rnn.rnn_cell.DropoutWrapper(cell, output_keep_prob=0.5)

# create a stacked RNN with 3 layers

cell = tf.rnn.rnn_cell.MultiRNNCell([cell for i in range(3)])
What this does is create a structure like such:
But this doesn’t look like a complete RNN, right? Yes. We need to unroll this and create a complete network now. For that we need to use tf.nn.dynamic_rnn function.
output, state = tf.nn.dynamic_rnn(cell, inputs, initial_state=rnn_tuple_state)
I would be remiss to not mention the tf.nn.static_rnn function here as it is present a lot in the beginner’s tutorials all over the Internet:
When I said that the dynamic_rnn function unrolls the RNN, it meant that the unrolling is conceptual. Actually it uses a tf.While loop to dynamically construct the graph when it is executed. In contrast, what static_rnn does is that it actually unrolls and creates a fixed sized graph that is incapable of accepting longer sequences, uses much more memory and makes the graph creation slow. So in short, just use tf.nn.dynamic_rnn.
Despite all the goodness, TensorFlow is often criticized for having an incomprehensive API which is non-intuitive and difficult to understand, especially for beginners.
For instance, it was very difficult for me to understand what the num_units argument did in the API discussed before. Does it refer to the number of time-steps? Or does it refer to the number of cell units that is there in the network? Or is it just a misnomer??
Well, you can be sure that num_units is just the size of the hidden vector representation output by the RNN. But TensorFlow doesn’t help make it easy. Learning about all those session and states doesn’t make it easy.
To deal with these problems, you need to know a high level API built on top of TensorFlow that can make it more usable — Keras.
Keras provides a simple keras.layers library for you to use in creating your own models. It contains various types of layers that you may use in creating your NN model viz. convolutional layers, pooling layers, recurrent layers, embedding layers and more.
In this tutorial we will discuss the recurrent layers provided in the Keras library. Some of these layers are:
Again, we will use the following diagram to explain the parameters that these layers expect:
But before we begin discussing the layers themselves, you must know that Keras provides 2 APIs for building a NN model: Sequential and Functional.
You can create a Sequential model by adding layers, one-by-one, to the object of the Sequential class.
The first layer in such a sequential model is where you specify the shape of the input vector (through the argument input_shape or sometimes input_dim or input_length ). This is the shape of the vector x[i] (i.e, any of the vectors from x[0] to x[t] in the above diagram)
model = Sequential()

# add the first layer - an LSTM layer, specifying the input shape

model.add(LSTM(100, input_shape=(1, 100), return_sequences=True)

# add the second layer - another LSTM layer

model.add(LSTM(100)

# add a dropout layer with a probability of 0.5

model.add(Dropout(0.5))

# add another Dense fully connected layer in the end

model.add(Dense(10, activation='sigmoid'))
All the layers and the models in Keras are callable. You can call a layer by passing an input tensor to it through the parameters and it will return an output tensor as such:
output_tensor = Dense(64, activation='relu')(input_tensor)
When using this API, you must remember to create Input layer as your first layer. This is the layer where you specify the shape of the input vector x[i].
input_tensor = Input(shape=(1, 100))

x = LSTM(100, return_sequences=True)(input_tensor)

x = LSTM(100)(x)

x = Dropout(0.5)(x)

output_tensor = Dense(10, activation='sigmoid')(x)

model = Model(inputs=input_tensor, outputs=output_tensor)
Now let’s discuss the various important parameters of the recurrent layers — SimpleRNN , GRU and LSTM :
This represents the size of the last hidden state vector output from the RNN unit. This along with the input shape that we defined before are necessary and sufficient to construct the weight matrix.
Self-explanatory
In the Deep Learning community, some people find that removing/using bias does not affect the model’s performance. Hence, this boolean parameter.
This is used to specify whether the network will return the hidden state for each time-step (every h[i] from h[1] to h[t] in the diagram above) or just the last one (h[t] in the diagram above).
In some cases, when we want to create a classification or a regression model for sentiment analysis, we only need an abstract representation of the input sequence which is captured by the last hidden state h[t].
Whereas in other cases when we want to stack the layers together or when we want to generate a classification for each time-step such as in trigger word detection, we need to pass the hidden state from each step to the next layer. In those cases, we set the return_sequences parameter as true.
In each time-step, an RNN takes two inputs:
The dropout parameter specifies the dropout to be applied to the input to each recurrent unit (specified by vertical arrows).
A part of an RNN where squares represent a single RNN unit
The recurrent_dropout parameter specifies the dropout to be applied to the hidden states of the recurrent units (specified by horizontal arrows in the above diagram).
Note: Keras also provides a Dropout layer in its library. Adding this layer to your model will drop units from the previous layer. So, using this layer in your RNN model will possibly drop time-steps too! If you use the parameters in the recurrent layer, you will be applying dropouts only to the other dimensions, without dropping a single step.
Being able to directly translate your thoughts into a program is probably the most important thing that you need do as a programmer. Sure this requires expertise on the programmer’s side but sometimes the language and the framework can also do wonders to help with this. This is where Keras can be extremely helpful.
You can go from idea to implementation in very clear, intuitive steps.
Another framework that excels at this is PyTorch. Its dynamic approach (as opposed to TensorFlow’s static one) is considered a major plus point. You should check out our tutorial — Getting started with NLP using the PyTorch framework if you want to get a taste for how doing NLP feels with PyTorch.
So get in on the action and go train some networks of your own!